Contacts.
Add, import, scan, and organize the people you work with.
Your contacts are the foundation of everything else in ListingStack. Leads get attached to a contact. Sales get attached to a contact. Emails go to contacts. The more complete your contact database, the more the rest of the app earns its keep.
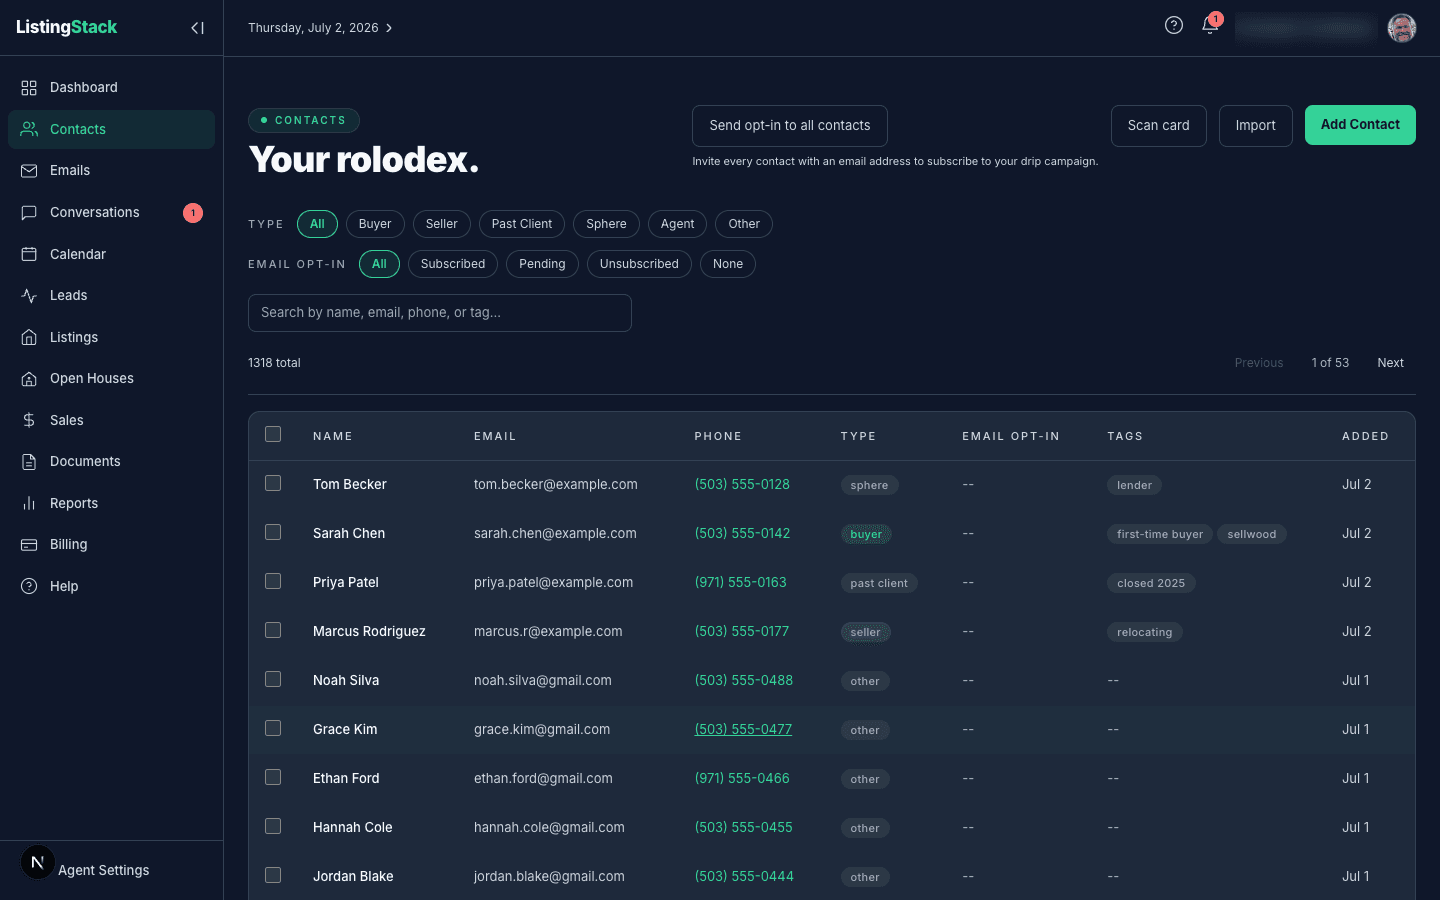
Adding contacts
From Contacts, there are two ways in, side by side at the top of the page:
- Add Contact — the standard form. The fields are mostly self-explanatory, but two deserve a note:
- Type — one of
buyer,seller,past_client,sphere,agent, orother. This drives behavior elsewhere: new contacts markedpast_clientorsphereget a double opt-in invite for your drip campaign by default and join once they confirm (you can change this in email settings). - Tags — free-form labels for whatever you want (neighborhood, referral source, lead temperature, etc). You can filter the contact list by tag.
- Type — one of
- Scan card — snap a photo of a business card (or pick one from your camera roll) and ListingStack reads the name, company, title, address, phones, and industry off it, then drops you into a pre-filled New Contact form so you can check it before saving. The same scan is available as Scan business card in the Add contact menu on the Dashboard, and from the New Contact form itself.
As you type an email into the manual form, ListingStack checks it against your existing contacts. A match doesn't block you — you'll see a non-blocking notice ("Looks like <name> already exists") with Open contact and Create anyway options, so you can decide in the moment instead of finding out later.
You can also scan a card onto an existing contact — look for Scan business cardon a contact's detail page. This merges the scan in without losing any data: it only fills fields that are currently blank, adds any new phone numbers that aren't already on file (up to the 4-number limit), and adds the card's industry as a tag if you don't already have it. Nothing you've already entered gets overwritten, and the previous card image is archived rather than lost.
Other email addresses
A contact can have more than one email address. ListingStack uses the extras to recognize them when they email you from a different address — for example a work address when their personal one is on file. Email you send still goes to their main address. You can add or remove extras any time from the contact form.
Multiple phone numbers
Each contact can hold up to four phone numbers, each with its own label — mobile, home, office, or other— and support for extensions (type an "x" after the number, e.g. (503) 555-0100 x12). Mark one number Bestand that's the number shown everywhere in the app — the contact list, lead and sale detail pages, and anywhere else a phone number appears in shorthand. The rest are still there when you open the contact. Clicking a number pops up Call and Text options, so you can reach them straight from the page.
Importing contacts
If you're coming from another CRM or a pile of paper, use Import at the top of the contacts page. There are two modes:
- CSV / Excel— upload a spreadsheet with headers matching the contact fields (first_name, last_name, email, phone, type, tags, and a few others). It previews what it found, shows any rows it can't parse, and lets you confirm before writing.
- PDF / Word— upload a document, even a scanned roster or a photo of a sign-in sheet, and AI reads the people off it. You land on a review step where every row is editable: fix a field, remove a row that doesn't belong, or add one that was missed. Rows that look like an existing contact are flagged with a Duplicate badge, and rows the AI is unsure about are flagged Low confidence and highlighted, so you know exactly what to double-check before importing. This mode reads up to 200 rows per file — split larger files and upload the rest separately. The review step also has an Import as toggle so the same importer can send rows to either Contacts or Leads.
- Google Contacts — connect your Google account and import straight from there, no file needed. We only ask to readyour contacts — ListingStack never changes or deletes anything in Google. Pick which Google labels to bring in (or import everyone), then review the list on the next screen and uncheck anyone you don't want before importing. Contacts already in your CRM are flagged: importing fills in their blank fields and adds anything new alongside what's there — extra phone numbers, addresses, tags, and birthdays are appended, a Google bio is added to the bottom of your notes, and a contact still typed Otherpicks up the type you chose for the import. Email is handled a little differently: if Google's main address differs from the one on file, it's added to Other email addresses, but any further addresses on the Google card are listed in the notes instead — they aren't added as extras, because every extra is used to match incoming email and a Google card often carries shared mailboxes like
support@that aren't that person. A field you've already filled in is never replaced. One label at a time keeps the review manageable; a preview shows at most 5,000 contacts. You can disconnect at any time with the Disconnectlink on this tab, which deletes the stored connection, or revoke access from your Google Account's connected-apps settings.
CSV/Excel and PDF/Word imports skip a row on write if its email matches an existing contact, leaving the original untouched. Google Contacts import goes a step further and fills in that contact's blank fields instead of skipping it. CSV/Excel and PDF/Word imports reformat phone numbers into a standard shape as they land; Google numbers come across exactly as they appear in Google. Either way, every number is searchable by its digits alone.
Bulk actions
Check the boxes next to rows in the contacts table (or use the header checkbox to select everyone on the page) and a toolbar appears with Edit, Export addresses, and Delete. Selection persists as you page, sort, or filter, so you can build up a batch across the whole list before acting.
- Edit applies a new type and/or adds or removes tags across every selected contact in one pass. Leave a field blank to leave it unchanged.
- Export addresses downloads the selected contacts as a CSV of mailing addresses, ready to upload to a handwritten-card or direct-mail service such as LettrLabs. Each contact contributes the address labeled Mailing, or their primary address if they have no mailing one. Contacts missing a street, city, state, or ZIP are left out of the file, and the toolbar tells you how many that was so you can go fill them in. The file also carries the contact's company (mail houses map it to the organization line on the envelope), plus email, phone, and tags as merge fields you can personalize the card with.
- Deletepermanently removes the selected contacts along with their linked leads, sales, and email subscriptions; it shows you the exact counts before you confirm. Edit and Delete cap at 100 contacts per batch, so deselect down to that count if you're over.
Searching and filtering
The contact list has a search input that matches name, email, phone, address, and tags as you type. Above the table sit three filter pill groups — Type, Email Opt-in, and Buyer Readiness — and most columns sort by clicking their header. Search and filters stack, and Select all N results selects everything matching the current combination, not just the visible page. On a phone, the pills collapse behind a Filters button that shows a count of active filters.
The Readinesscolumn shows each contact's buyer pre-approval readiness badge — the first header click sorts the most-ready buyers to the top. See Buyer Profiles & Surveys for what drives the badge and how to collect the underlying info.
Clicking a contact's address in the Email column opens the in-app compose window for that contact right from the list, instead of opening the row.
One contact per email address
Your workspace keeps a single contact for each email address. Adding a contact whose email is already in your workspace stops with a message and a link to the existing record, and a lead, open-house sign-in, referral, or import that arrives with a known email attaches to that contact instead of creating a second one. If two people share one address, keep them as one contact (or give one of them a different email) — the merge tools below combine records you already have.
Possible duplicates
ListingStack watches for contacts that are probably the same person. Open Possible duplicates to review them as pairs — v1 matches on shared email only. Each pair has a one-click Merge that opens the merge modal pre-targeted at that pair, and a Not a duplicatedismiss that's remembered so the pair won't resurface. A banner appears on the main Contacts list whenever duplicates are waiting for review — that's the fastest way in.
Merging contacts
You can also start a merge from a single contact: look for Merge duplicate…on its detail page. The modal has you pick the other contact, choose which record survives (swappable, so a wrong first pick isn't a problem), and shows a preview of what will move or combine before anything happens. Type mergeto confirm. There's no undo, so use the preview.
The subscription status column
Every contact shows their current email subscription status in a dedicated column:
- Subscribed — they confirmed the double opt-in and will get drip emails
- Pending — they got the opt-in invite but haven't confirmed
- Unsubscribed — they opted out, and you shouldn't re-enroll them
- — (dash) — no subscription record; they've never been enrolled
The contact detail page
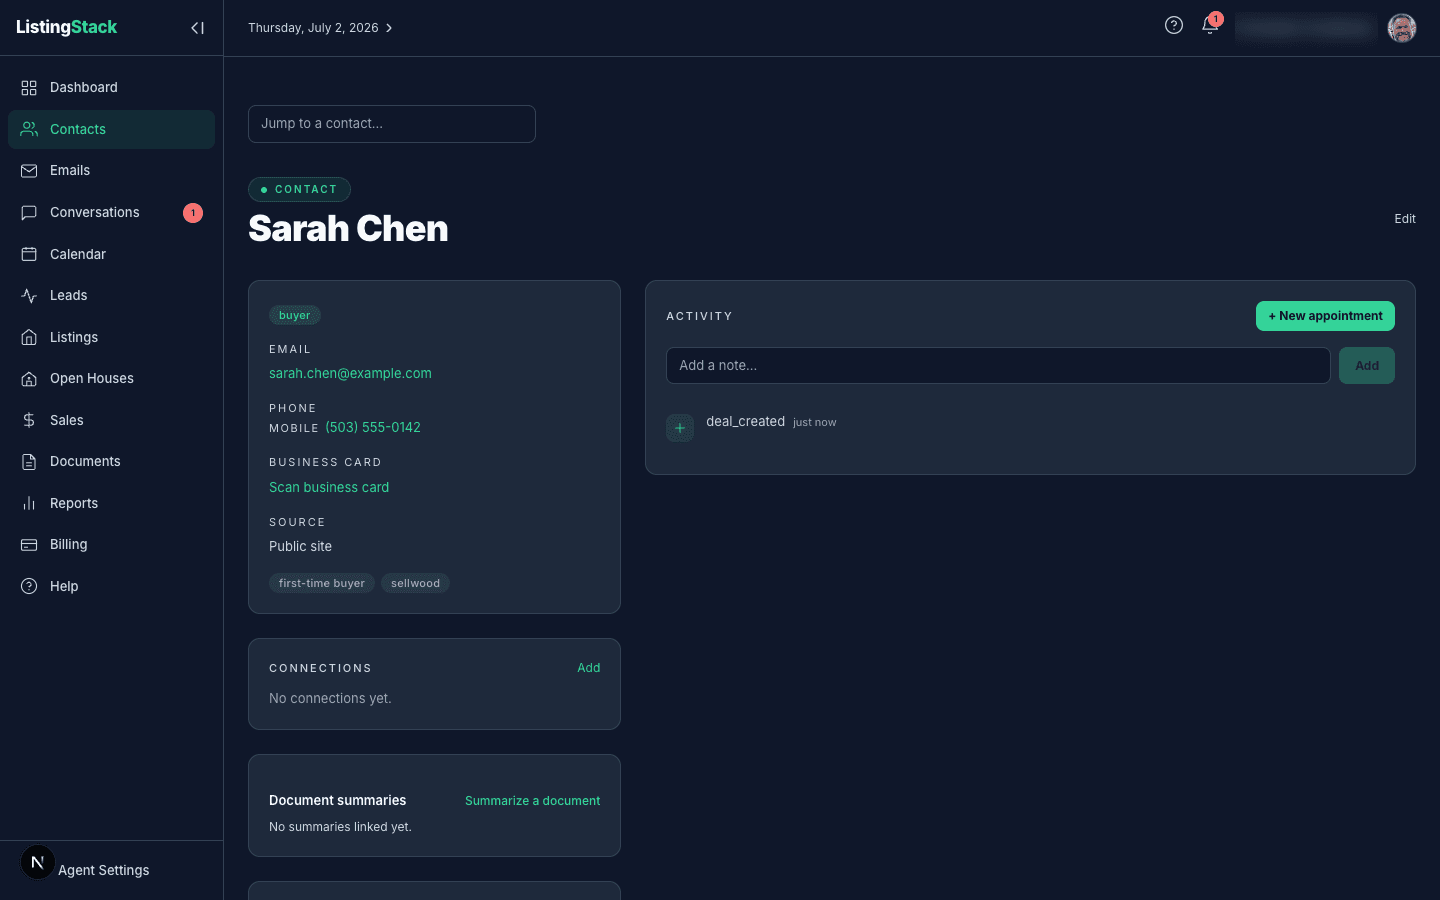
On a contact's detail page you can add connections — a buyer and their spouse, a referral source, a parent who pointed their adult kid at you. Connections are directional (with a relationship label) and show up on both linked contacts.
If the person isn't in your contacts yet, you don't have to leave and come back. Start typing their name in the connection search and choose Add “…” as a new contact— fill in a name (email and phone are optional), and they're created and selected in one step so you can finish the connection right there.
Two more cards live here worth knowing:
- Buyer Profile — the buyer-requirements survey, pre-approval readiness, and prep-email controls. Covered in full in Buyer Profiles & Surveys.
- Documents— upload files straight onto the contact (a pre-approval letter, an ID, a signed disclosure), get an AI summary of any upload, and generate documents from your templates with this contact's fields pre-filled. See the Documents guide for how the card works.
Notes
Every contact has a free-text Notes field on its detail page — and global search matches note content too, not just name and email (see Getting Started for how search works).
Deleting contacts
Deleting a contact from the detail page removes the record. Sales and leads that referenced that contact are left intact (they'll show "Unknown" in place of the name). That's intentional: you don't lose transaction history just because you cleaned up the rolodex.
past_client or sphere is the fastest way to seed your drip program. Those types get an opt-in invite as soon as you create them, and join the drip campaign once they confirm it.